

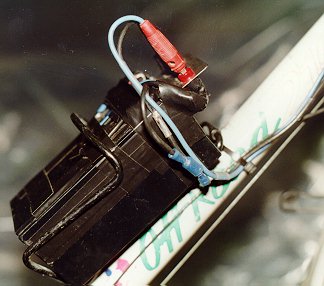
To make a light that could be removed and installed as easy as a bicycle-computer require that there was no wires between the light and the battery and switch on the bike. It took Kolbjørn (who helped me make the light) and me a few weeks to find out how to make a "wire-less" connection that would work in all kind of weather conditions and that would not break after some use.
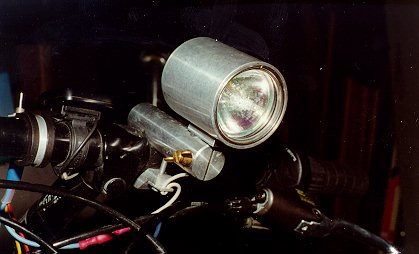
The design of the X-light II is more or less a copy of the X-light. A plexiglass, a rubber gasket and a locking ring keep the bulb in the tube. The unit is not 100% waterproof, but it should resist rain and snow without much problem. Sofar I have not had any problem with water inside the unit.
The major difference between the X-light II and the old
X-light is that it can be removed from the bike.
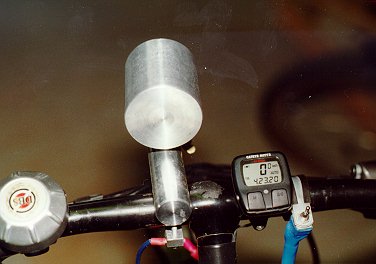
This require a mounting bracket fasten on the bike.
A small aluminum tube is mounted under the X-light II. This tube fits into a
hole in the mounting bracket. A screw with a wing-nut on the bracket is used to secure
the X-light II when mounted. By tightning the wing-nut, the hole get narrower
to fasten the light.
Inside the tube is a small female power pin insulated from the tube. The power pin
in is covered with gold to prevent corrosion.
A gold covered male pin is located at the bottom of the hole in the mounting bracket.
This pin is connectedt to the power switch.
With this solution it takes me only a few seconds to mount the X-light II unit on my bike (if I use more than five seconds my hands must be very cold!). I do not have to think about connection the unit to the wires on the bike.
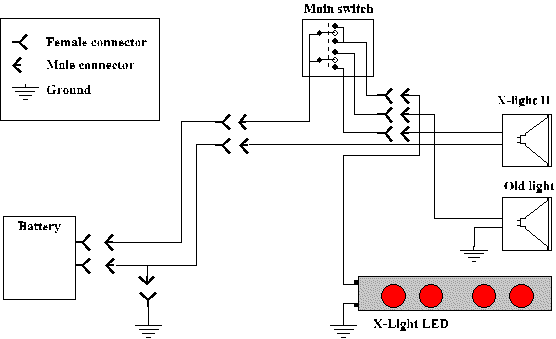
The power wires go from the battery to a main switch on the handle bars. The switch has three positions: On - Off - On. In the first on-position The X-Light II will be on. In the other on-position the old bicycle light is on, which saves energy on longer tours. In both on-positions The X-Light LED taillight is turned on.
Thanks to Kolbjørn Lindgjerdet how helped me with the light. If you have any questions about The X-light II, please e-mail me.